
FAQ’s
Yes, we created a copy of the instructions online, which can be found here. Printable Mueller Instructions in PDF
Remove the scope from the rings and see if this resolves the issue. If it does, it means the rings are causing stress on the tube which is affecting the internal side focus mechanics. Stress on the tube from the rings can also cause the side focus to have more backlash and also cause tight spots. NEVER fire the rifle when there is an issue with the side focus, always resolve it before firing the rifle, otherwise, you can damage the internal side focus mechanics. For this reason, we always recommend using the Burris Signature Zee rings or the XTR Signature rings and tightening the ring caps to no more than 18 inch-pounds. These rings are designed to remove stress on the mounting tube due to their design
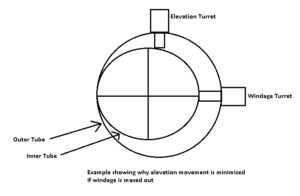
This is probably the most common issue we see (PLEASE WATCH THE VIDEO LINK BELOW). If all of the internal adjustment has been used when sighting in the scope, here are some common situations. The rifle can be suffering from barrel droop, which is a barrel that points downward in relation to the receiver (most common). Another possibility is the scope could be mounted too far off of the barrel, at closer ranges, this can cause the scope to run out of adjustment. This may not have been a problem with another scope mounted on the rifle because different scopes have more or less internal adjustments. Usually higher power scopes have less internal adjustment range and side focus scopes will also have limited adjustment range because the side focus is located in the center of the turret housing where the adjustment room is available. Either way, there should still be enough adjustment range UNLESS there is a miss alignment issue in your setup.. Also, if one turret is near the limit of its adjustment range there will be a reduction in the amount of adjustment on the opposing turret. For example, if the windage adjustment is near the outer edge of its adjustment range, the available elevation adjustment will be reduced and vice versa. This is illustrated in the figure below. One solution is Burris Signature Zee Rings with off-set inserts; this would raise the back of the scope bringing the objective lens down. We never recommend shimming just one ring because this will put stress on the tube and can also damage the tube. You can shim the base, but only if it is a one-piece base, shimming a two-piece base can put a bind on the tube of the scope possibly damaging the scope. In the Diagrams, the outer circle represents the main tube of the scope when looking through the optic. The inner-circle represents the erector system or internal lens cluster that reacts when making windage/elevation adjustments on the scope. The arrows illustrate the amount of travel remaining on the opposite axis as windage/elevation adjustments are made; helping illustrate how an adjustment in one direction limits the amount of travel in the other. In the diagram the scope has used all of its windage adjustment, causing the scope to be limited with its elevation adjustment.
Here is a great video link explaining the most common reason for running out of elevation. However as mentioned previously we DO NOT recommend shimming just one ring, instead, we recommend using either a tapered MOA base rail or if you have 2 separate bases we recommend the use of “Burris Signature Zee” rings with the “Offset Inserts”.
VIDEO LINK: RUNNING OUT OF ADJUSTMENT
The most common issue we see here is the way a scope was mounted and the damage caused by improper installation. We understand scopes leave witness marks, but by no means should a mounting ring leave indentations or clamping marks on the main tube of the scope. For this reason, we always recommend the utmost care when mounting a riflescope, including following the ring manufacture torque specifications, making sure the rings are aligned and the scope will seat properly in the rings before they are tightened. Rings may also require lapping to ensure proper alignment, ring to scope contact, and remove any imperfections in the rings that may cause damage to the tube of the scope. Please keep in mind that tube damage of any kind “voids” the Mueller Warranty. It is clearly noted in the directions, which come with every Mueller scope, “Your scope is not covered by the warranty if damage results from the improper installation“. Mueller Optics LLC will not be held responsible for ring manufacture defects, which cause damage to a Mueller Rifle Scope. With today’s social media at our fingertips, including many how-to mount your scope videos and publications available at our fingertips, there is absolutely no reason anyone should be damaging scope tubes when mounting scopes.
Please keep in mind that a “properly” mounted scope should not leave any ring dings, dents, or impressions in the tube.
All Mueller Illuminated scopes use a #CR2032 Battery.
Once Mueller lenses are precision ground and polished from edge-to-edge using top-quality optical glass, the lenses are then coated with 11 layers of EuroCoat™ on all air-to-glass surfaces and heat treated. EuroCoat™ enhances clarity, improves contrast, and maximizes the amount of light transmission to the eye. Our new combination of lenses and EuroCoat™ offers an extremely bright and sharp sight picture that can only be found in much higher-priced rifle scopes. Coating Terms
- Coated: Lens surfaces or surfaces are coated to improve clarity and light transmission.
- Multi-Coated: One or more surfaces of one or more lenses have been coated with multiple films.
- Fully Multi-Coated: All air-to-glass surfaces have multiple films.
- Euro-Coated: All air-to-glass surfaces are Fully Multi-Coated with 11 layers of EuroCoat™ and heat-treated which reduces glare and provides an extremely bright and clear sight picture.
How do I use Mueller Sport Dot™ Scopes as Rangefinders?
By knowing the average length of a target such as a sample 32″ Delta® Deer we used below, we are now able to judge the yardage of a similar-sized target for accurate shot placement. This same theory can be used on many different size targets such as Deer, Elk, Bear, Mule Deer, Moose, etc. To the left is just one example of how we used the Sport Dot reticle to judge yardage The scope used in this demonstration is our Mueller Sport Dot 4-16x50AO. The overall length from Chest-to-tail on the Delta decoy is 32″.
This photo was shot through the scope at 100yds on 4 power. We now know that if a target of this size fits between the heavy portion of the cross hairs on 4 power, the target is roughly 100 yards away.
This photo was shot through the scope at 200yds on 8.5 power. We now know that if a target of this size fits between the heavy portion of the cross hairs on 8.5 power, the target is roughly 200 yards away.
Mueller Optics prefers targeted advertising with reviews in online journals and word-of-mouth endorsements from satisfied customers rather than mass-market advertising. This allows us to greatly reduce advertising costs associated with mass-market advertising. By doing so, we can eliminate these costs from the price of our products. In all, we don’t feel you should be paying the excessively high costs of today’s advertising which can cost in excess of $5,000 for just one Magazine ad. Please help us in promoting our line by spreading the word about Mueller’s new line of Rifle Scopes so we can continue to offer our products at a reduced rate. Helping us promote our line can be done in many ways and can include such places as; Online Hunting and Shooting Forums, Rifle Ranges, Sporting Goods Stores, Hunting Trips, Guide Services, etc…Mueller Optics greatly appreciates your support and would like to thank you in advance for taking the time to mention our new line of Mueller Rifle Scopes.
First, the scope has to have finger-style turrets or exposed target-style turrets. There are either set screws around the circumference of the turret knob or on the top of the turret knob. These screws can be loosened and removed after the rifle has been sighted in. After screws have been removed simply remove the turret knob and place it back on the turret post at the zero mark. The zero will be accurate at the distance the rifle has been sighted. Further distances may vary due to bullet drop or different bullet trajectories.
First, we must consider a couple of things before sending the scope in for warranty work or evaluation. First, do we know what kind of groups this rifle can hold? Are we using the same ammo or has the ammo been changed prior to the last time the rifle had been shot? Is this a new rifle, for which we do not know what kind of groups it can hold? Is the scope mounted correctly, with the windage and elevation turrets positioned in the direction intended? Have the scope mounting rings been tightened to the ring manufacturer’s torque specifications? All of these options need to be considered.
Different objective sizes, shooting comfort, and fast target acquisition are the main factors when choosing a ring height. Make sure your scope rings lift the scope high enough that the lower lip of the objective does not touch the barrel. Make sure that the rings clear the scope of the action. Bolt-action guns have an extension that rises to the side and upward as the gun is cocked to reload the chamber. Be sure that the rings are large enough to raise the scope above the handle of the bolt as it is drawn back. Adjust the ring height to your shooting style. The real key to determining proper scope ring height is to find the scope location that is most comfortable for you. Try a variety of heights and choose the size that places the front lens in front of your eye when you take a comfortable and consistent shooting position. Some scopes are limited in their internal adjustment range and there is no choice but to mount the scope as close to the barrel as possible without touching it. This is to eliminate the use of the adjustment range in the scope because the scope is lacking the amount of adjustment that other scopes may have.
We recommend using Burris Signature Zee Rings™ because they offer inserts that clarify a true mount without putting a bind on the tube of the scope. If the Burris rings are not an option for someone we always recommend a good horizontal split ring, vertical split rings can make it difficult to mount and may put stress on the main tube of the scope. This is hard to determine when using vertically split rings. We always suggest having a reputable/experienced gunsmith or an authorized Mueller Optics dealer mount the scope for the customer.
Mueller doesn’t offer an option for a reticle change in the Mueller Line of scopes. The reticle that is offered with each scope is the only option for that scope. There are companies out there that do install custom reticles but keep in mind, that this will void the warranty on a Mueller scope.
Any alterations made to a Mueller scope that hasn’t been done by Mueller are considered tampering and are not covered under the Mueller Warranty.
First, verify the scope hasn’t been dropped or tweaked. 1. Lay the scope in the lower ring halves (leave the top halves off), spin the scope, and see if the front or rear of the scope wobbles up and down. If it doesn’t wobble move on to the next step.. If it does wobble it cannot be fixed.2. Center both turrets by turning the turrets from one extreme to the other and then splitting the difference (you don’t have to be exact, just close to the center).3. Now that both turrets have been centered, retry sighting in, if the scope does not make adjustments, or track then the scope needs to be evaluated by Mueller Optics. If the scope has run out of adjustment then steps need to be taken in the mounting hardware to compensate for the serious misalignment issue.
If all of these tests have been performed and your Mueller scope is still not performing then the scope needs to be sent back to Mueller to be evaluated. We recommend that Mueller customers deal directly with Mueller Optics for warranty service. This way Mueller can find the problem and address the issue, with a solution.